How to Take off Jumper Cables: Quick and Easy Guide
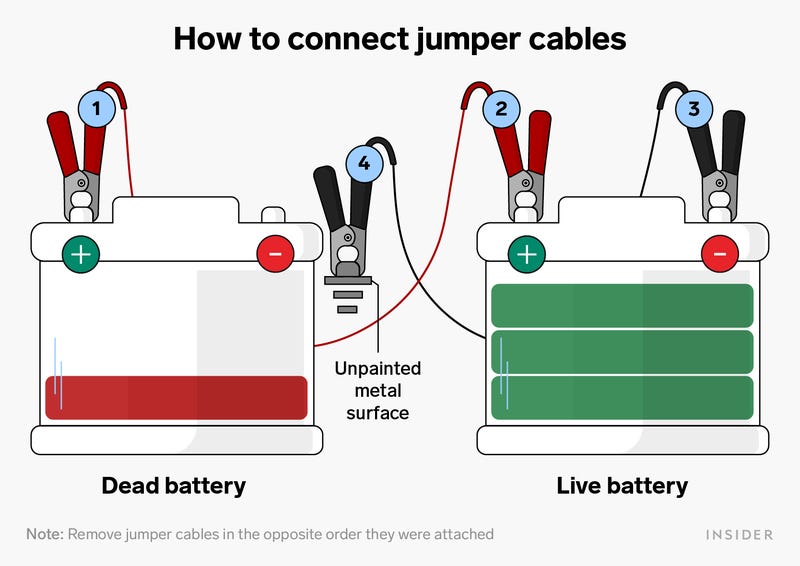
To take off jumper cables, turn off both engines. First, remove the black (negative) cable from the grounded metal surface, then from the booster battery. Next, remove the red (positive) cable from the dead battery, then from the booster battery. Ensure clamps don’t touch each other during removal.
Jump-starting a car is a skill every driver should know, but what happens when it’s time to take off those jumper cables? This seemingly simple task can feel daunting, especially if you’re worried about sparks flying or damaging your car’s electronics.
The good news? It’s easier than you think. In this guide, you’ll discover how to safely and confidently remove jumper cables, ensuring your car is ready to hit the road again. By the end, you’ll feel empowered, knowing that a dead battery won’t leave you stranded. Ready to turn your worry into confidence? Let’s dive in and make sure you’re prepared for the road ahead.
How to Take off Jumper Cables
| Step | Action | Details |
|---|---|---|
| 1 | Turn off both engines | Ensure both vehicles are off for safety. |
| 2 | Remove black cable from grounded surface | Start with the negative (-) clamp on the metal surface of the dead car. |
| 3 | Remove black cable from booster battery | Detach the other end of the negative (-) cable from the working vehicle. |
| 4 | Remove red cable from dead battery | Carefully detach the positive (+) clamp from the previously dead battery. |
| 5 | Remove red cable from booster battery | Finally, remove the red clamp from the working car’s battery. |
| 6 | Avoid touching clamps together | Prevent sparks by keeping the clamps from touching each other. |
Safety Precautions
Removing jumper cables involves careful steps to ensure safety. Start by disconnecting the negative cables from both vehicles. Next, remove the positive cables, avoiding contact with metal surfaces to prevent sparks.
Safety is paramount when dealing with jumper cables. Ensuring you follow the right precautions can prevent accidents and damage. Before you start, it’s crucial to understand the risks involved and how to mitigate them effectively.
Check Your Surroundings
Always be aware of your environment. Are there moving vehicles nearby? Is the ground wet or slippery? These factors can affect your safety. Make sure you’re in a stable and secure area before proceeding. If possible, position your car away from traffic and ensure adequate lighting.
Wear Protective Gear
Your hands and eyes need protection. Gloves can prevent shocks or burns, while goggles can shield your eyes from sparks. Ever had a battery spark fly unexpectedly? It’s not a pleasant experience, and protection can make a huge difference.
Ensure Proper Cable Connection
Incorrect connections can lead to sparks or battery damage. Verify that each cable is securely attached to the correct terminal. This step might seem basic, but it’s often overlooked. Double-checking can save you from costly mistakes and ensure the jumper cables function correctly.
Disconnect In The Right Order
The sequence is crucial when removing jumper cables. Detach the negative cable first, followed by the positive. This helps prevent electrical shock and keeps the battery safe. It’s a simple rule that can prevent accidents. Have you ever mixed up the sequence? Remembering the correct order can prevent potential hazards.
Inspect For Damage
Before and after using jumper cables, inspect them for wear or damage. Frayed cables can be dangerous and ineffective. You wouldn’t want to rely on faulty equipment, right? Regular inspection helps maintain safety and ensures your tools are ready for use.
Ask For Help If Needed
Don’t hesitate to ask for assistance. If you’re unsure about the procedure, a quick call to a friend or a neighbor can be invaluable. Have you ever found yourself in a tricky situation without help? Asking can make the process smoother and safer.
Reflect On The Process
After completing the task, take a moment to reflect. Did everything go as planned? Were there any unexpected challenges? Reflecting can help you improve your technique and ensure a safer experience next time. Have you learned something new today? Share your insights with others. Safety isn’t just about following steps; it’s about being aware and prepared. As you remove your jumper cables, keep these precautions in mind to ensure a safe and smooth process.

Credit: es.pinterest.com
Read more: How to Disconnect Jumper Cables Safely and Easily
Identifying Positive And Negative Terminals
Identifying positive and negative terminals is crucial for safely removing jumper cables. Using jumper cables incorrectly can damage your car’s battery. It may also cause electrical shocks. Understanding terminal markings is essential.
Identifying Positive Terminal
The positive terminal usually has a plus sign (+). It’s often red. Red signifies the positive charge. Look for a red cap or cover. This is your cue for positive connection.
Identifying Negative Terminal
The negative terminal is marked with a minus sign (-). It’s typically black. Black indicates a negative charge. Check for a black cover or cap. This helps in identifying the negative terminal.
Read more: Car Struggles to Start But Battery is Fine: Hidden Culprits
Visual Clues For Terminal Identification
Visual clues aid in recognizing terminals easily. Color-coded cables are helpful. Red is for positive. Black is for negative. Look for these visual markers. They assist in preventing mistakes.
Checking Terminal Labels
Terminal labels are often clear. Check for markings on the battery. Positive is marked with a plus (+). Negative is marked with a minus (-). These labels guide proper cable removal.
Safety precautions are vital. Avoid touching metal parts. Wear gloves for protection. Ensure both vehicles are off. This prevents electrical hazards. Follow these steps for safe cable removal.
Removing Jumper Cables Safely
Taking off jumper cables may seem simple, but doing it safely is crucial. It’s easy to feel a sense of relief once your car is up and running. However, removing the cables improperly can lead to sparks or even damage your vehicle’s electrical system. Let’s delve into the steps to ensure you remove jumper cables safely and efficiently.
Disconnecting The Jumper Cables In The Right Order
Start by removing the negative cable from the vehicle that was jump-started. This step is essential to prevent any accidental electrical surges. Next, detach the negative cable from the donor vehicle. Finally, remove the positive cables from both vehicles. Following this sequence minimizes the risk of sparks and keeps you safe.
Avoiding Direct Contact With Metal
Ensure that the cable clamps don’t touch any metal parts while removing them. This precaution prevents unexpected sparks that could frighten you or cause harm. It’s a simple step, but overlooking it might lead to surprising consequences. Have you ever had jumper cables spark unexpectedly?
Checking The Cables For Damage
Once removed, inspect the cables for any signs of wear or damage. Look for frayed wires or rusted clamps. Damaged cables can lead to poor connections in future jump-starts. It’s wise to replace them before they fail you in a critical moment.
Storing Jumper Cables Properly
Roll them up neatly and store them in a cool, dry place. Proper storage prolongs their lifespan and ensures they’re ready for your next emergency. Consider investing in a storage bag to keep them organized. Does your car kit include jumper cables?
By following these practical steps, you ensure safety and readiness for future use. Remember, a few careful actions today can save you from headaches tomorrow. Are you prepared to handle jumper cables safely?
Storing Jumper Cables Properly
Organizing jumper cables safely involves disconnecting them with care. Start by removing the black clamp from the grounded vehicle. Proceed to detach the red clamp from the charged battery. Ensure cables are untangled and stored in a dry, accessible location for future use.
Properly storing your jumper cables is essential for maintaining their longevity and ensuring they’re ready for action when you need them. Have you ever found yourself in a situation where your car wouldn’t start, and your cables were tangled beyond belief? Storing them correctly not only saves you time but also extends the life of your cables. It’s a small task that can make a big difference.
Coiling Your Jumper Cables
Start by coiling your jumper cables neatly. Lay them flat on the ground and loop them in circles about the size of a dinner plate. This helps prevent kinks and knots, which can damage the internal wiring over time.
Using Cable Ties Or Velcro Straps
Once coiled, secure the cables with cable ties or Velcro straps. These handy tools keep the cables from unraveling and ensure they stay organized. You can find these at any hardware store, and they’re a great investment for keeping things tidy.
Storing In A Suitable Bag
Place your coiled and secured cables in a sturdy bag or case. Many jumper cables come with a storage bag, but if yours didn’t, any durable bag will do. This protects the cables from dust and moisture, which can cause corrosion.
Keeping Them In An Accessible Spot
Store the bag in an easily accessible location, like your vehicle’s trunk or under the seat. This way, they’re always within reach when you need them. Avoid placing them in a cluttered space where they can get buried and forgotten.
Checking The Condition Regularly
Make it a habit to check your jumper cables regularly for signs of wear and tear. Look for exposed wires or damaged clamps. If you notice any issues, it might be time to replace them to avoid getting stranded. Do you have any tips for keeping your car essentials organized? Proper storage of jumper cables is just one step towards a more efficient and stress-free driving experience. By taking these simple steps, you ensure that when an unexpected car battery issue arises, you’re prepared to handle it quickly and efficiently.
Troubleshooting Common Issues
Removing jumper cables safely is crucial to avoid electrical mishaps. Start by disconnecting the negative cable from both cars, then remove the positive cables. Ensure cables don’t touch, preventing sparks.
Taking off jumper cables might seem straightforward, but you can encounter common issues that make it tricky. Addressing these challenges effectively ensures you don’t end up with a drained battery or a damaged car. Let’s dive into troubleshooting these common issues.
Misaligned Connections
Sometimes, cables are accidentally connected to the wrong terminals. This might have happened to you in a hurry, right? It’s crucial to double-check before removing them. Ensure the red clamp is on the positive (+) terminal and the black clamp is on the negative (-) terminal. Getting this wrong can lead to sparks or damage.
Weak Or Loose Clamps
Loose clamps might not provide adequate power transfer. You may notice this when your car isn’t starting even after a jump. Make sure the clamps are firmly attached. Test them by gently pulling on the cables; they should stay in place without slipping off.
Battery Corrosion
Corrosion on the battery terminals can hinder the connection. Have you ever seen that white, crusty build-up? It’s a sign of corrosion. Before removing the cables, check for any corrosion and clean it with a mix of baking soda and water. This ensures a smooth detachment and prevents future issues.
Dead Battery
Sometimes, despite your best efforts, the battery might be completely dead. Have you considered that the battery might be beyond saving? If your car still doesn’t start, it might be time for a replacement. Assess the situation and consider seeking professional help.
Electrical System Damage
Incorrect removal can lead to electrical system damage. You wouldn’t want that, right? Always remove the cables in the reverse order of how you connected them. Start by removing the black clamp from the car that was receiving the jump, then the black clamp from the donor car. Follow this with the red clamp from the donor car and lastly, the red clamp from the receiving car. Taking the time to troubleshoot these issues can save you from a world of trouble. Have you encountered any of these problems before? Reflecting on past mistakes can provide invaluable lessons.

Credit: professionalbgroup.com

Credit: www.lokithorshop.com
Frequently Asked Questions
What Is The Correct Order To Remove Jumper Cables?
First, remove the negative cable from the dead battery. Then, remove the negative from the good battery. Next, take off the positive from the good battery. Finally, remove the positive from the dead battery.
Why Is It Important To Remove Jumper Cables Carefully?
Removing jumper cables carefully prevents sparks and protects your car’s electronics. It ensures safety and avoids any damage.
Can Removing Jumper Cables Incorrectly Damage My Car?
Yes, incorrect removal can cause electrical surges. This may harm your vehicle’s electronic systems. Proper steps avoid this risk.
Conclusion
Taking off jumper cables is simple with the right steps. Always ensure safety first. Disconnect cables in the reverse order of connection. Remove the black clamp from the grounded metal surface. Then, remove the black clamp from the dead battery.
Next, take off the red clamp from the charged battery. Lastly, remove the red clamp from the dead battery. Store the cables neatly for future use. Remember, practice makes perfect. Stay calm and follow these steps. You’ll get better with each attempt.
Safe driving and happy travels!
As Amazon Associate, we earn from qualifying purchases.